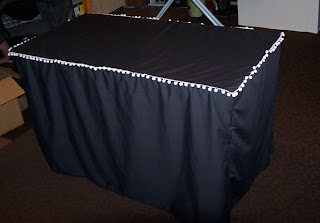
I made these at the end of 2007 after 2 years of figuring out what I would like my tablecloth to do. I hate having any hint of the table showing if there are items underneath (which is always the case for me). I sewed the corners together to make sure the wind would not blow these up (which also keeps your products that are on the table from getting knocked around by the cloth). While I did sew the corners I didn't sew all the way to the ground. That idea came from the experience of selling in tents. One of my tables worked best being shoved up against my tent wall so I needed to be able to get at it from the front or side. With the slits I can lift up the cloth just enough to get what I need. This has also come in handy when the tent is full of people and one of us is busy behind the main table with transactions but other items need to be taken out from underneath to be restocked.
Most of the time though the back is our main access point. It also gets lifted up a lot and it's hard to lift up 4 feet of cloth without knocking things on top around. So I cut the back wall right up the middle and added bias tape to the edges. It is wonderful and makes grabbing drinks, bags or whatever else we need a cinch.
If we're at a show that provides tables we usually opt for that since it means less for us to carry. One time I grabbed a set of black sheets for a quick fix that I meant to sew but I cut them and arrange them in such a way that no cut edges ever show so I'm pretty happy with how they are. I cut one queen flat sheet into 2 strips that are wide and long enough to cover either a 6 or 8 foot table. I put those down first and adjust the length so they're touching the ground and then put a little bit of tape down to keep them from sliding off. Then I place another flat sheet that has been cut to also accommodate a 6 or 8 footer. It's long enough to overlap the sides to work for any length of table and hits the ground in the front with the back having a foot or so of clearance for easy access. I used to adorn it with a white circle table cloth that I stitched my name on using felt letters I cut out and trimmed with pom-poms. But these don't last very long since the white gets pretty dirty (the one below is my second version. Now I either wrap my super long outdoor banner* around the table or the pennant banner (this is where those thumbtacks come in handy).
 | |
| fare thee well, circle cloth |
 |
| good day, big banner |
Probably at the end of next year I'll make some new tablecloths but I'll most likely spend this show season trying to figure out exactly what I want and how to make them fit different lengths. Good lord, I can't believe I just wrote about tablecloths for this long.
*my totally awesome banner was made by our friend Denman Rooke. I gave him paint and some black cloth that was cut to size and asked that he make something that would fit in with the style of our signs and website. He presented me with this and I probably sat and stared at it in quiet love for about an hour. After I was done hugging it I put on a backing, sewed it together and then put white bias tape all around. Later on we pinned 2 squid to the corners for fun. Go to his site and marvel at all of his self-taught awesomeness.


No comments:
Post a Comment
Note: Only a member of this blog may post a comment.